*This product may have a special quality, scratches, or scars on the panels using the printed circuit board.Please accept the purchase request.
MUSICAL FEATURES
※
Japanese manualsand so on.
It is the evolutionary form of a microsound module that uses tape-operational techniques.Organize the tape with scissors, or recombine sound by reproducing the playback speed or direction with the Vari-Speed, or by making the sound granurer process in Gene-Size.Morph can also be a superimposed Gene.It is also possible to interact with surrounding modules using envelope-for-or EOSG-output triggers.
- All parameters related to sound manufacturing are voltage controllable.
- Input/output is a stereo, and the input will have automatic level adjustment.
- Virtual tape recordings for recording can be recorded to 2.9 minutes (firmware MG137 or higher).
- There can be a total of 299 sprin markers for each reel.
- SD card slot for saving multiple reels
- You can use the sound-layer sound-on sound method.
- Playback and recording can be done independently, like separate machines.
- Vari-Speed can go over three octaves or more, from a 12-half-sound increase to a 26-half-sound descent.
- a 24-bit codec, a 48kHz/32 bit wav file.
- You can use the SD card to backup the contents of the reel to your computer, etc.
- Empty SD Card
HOW TO USE
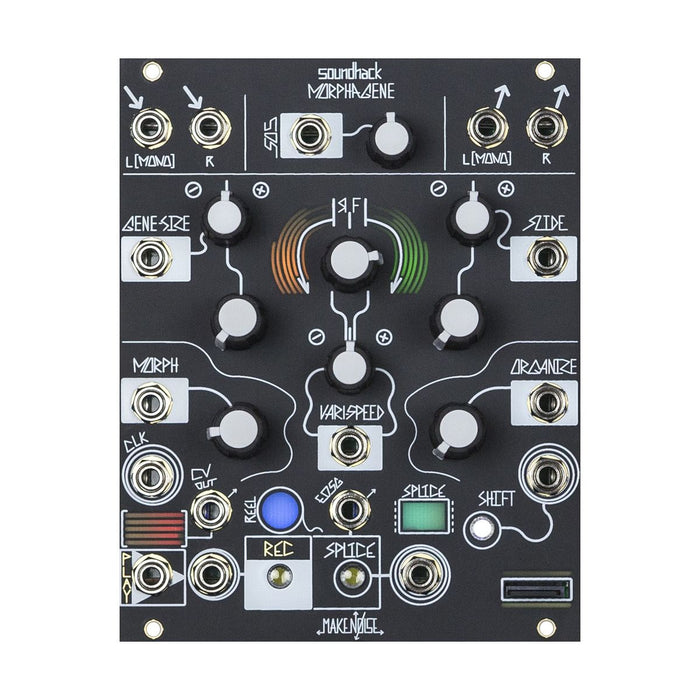
Interface
A description of each part is displayed with a mouse over.
Reel and Splice
In Morphagene, the sample sound
Lilleit is replayed as a sound on a virtual tape called a virtual tape. In the reel,
SpliceYou can create a tape-like area, and a sprise marker that separates the splice can press the Splice button during playback, enter a trigger, or create it in the software (Reaper). The end and end of a loop range or a one-shot replay is determined by the splice.
OrganizeControl, or
Shift buttonand trigger input allows you to move the splice.If you change your splice when you are in a loop, you can play back to the end of the splice and then move on to the newly selected splice playback.Lille has a maximum of 2.9 minutes (firmware MG137 or higher) and a number of small markers will be 299.
If the microSD card is not mounted, Morphagene can create only one reel, and the recording is done on the reel.You can also load a new reel by selecting from multiple wav files by using a microSD card.
Sound recording
To record the input sound to Morphagene, patch the input to Inputs Jack and press the REC button.Then press the REC button to stop recording. In this recording method, it is recorded on the selected splice and is not overwritten by other splices.The recording, such as Vari-Speed, does not affect the recording. When you're recording a sound to an existing splice,
SOS ControlThis allows you to record an existing audio overlay on a splice. When the SOS is left full, only new input sounds are recorded, and only the current sound is recorded on the new splice when the SOS is full. In Morphagene, it is possible to perform a collage of various images by recording these multiple recordings in such a way.
Press the SPLICE button while recording on the new splice while pressing the REC button.For example, when SPLICE is turned around to the right, Organize, and so forth, you can create a new splice recording to reflect these operations, as well as recording replay splices or playing back on playback parameters.
Recording and calling a reel on a microSD card
In Morphagene, the wav file in the Fat32 format of a microSD card can be called as a reel.Prepare the audio that you want Morphagene to use as a 32-bit, 48kHz stereowav file, and place it in the root (top) folder of the root (top) folder of mg1.wav, mg2.wav, mg3.wav, ... mg9.wav, mga.wav, mgb.wav, ... mgw.wav. (up to 32 rhees).
Insert and mount the microSD card.If the Shift button is not illuminated, the microSD card is not mounted, and then press the Shift button to mount it.Then press the SPLICE button, and then press the REC button.
reel modein the following order:In the reel mode, you can use the Organize knob to select the wav file that is provided in the microSD card as a reel.The window changes color for each wav file that you select, and it will be white last, but you can load this spacetime reel and record it in a new reel.Ensure that CV controls such as REC, Splice, Shift, Organize do not work during the reel mode. Press the SPLICE button again and press the REC button to get out of the reel mode.
The newly loaded reels and the editing of the splice are reflected in the file in the microSD card.
It is rewritten.If you do not want to make changes to the file itself, disconnect the microSD card (in a less busy condition) immediately after the new reel is called.
Processing the sample with each control
In addition to cutting the reel with Splice, Morphagene has a number of controls for modulation of reels and playback.Nearly all parameters can be used to control the control of a CV or gate, other than a knob or button, and use them to make a wide range of synthesized sound with sound snippets (microsound).
Vari Speedis the replay speed control of the virtual tape.The faster you turn to the right, the higher the speed, the higher the sound.When the knob is on the left side, the replay goes backwards, and the more you turn on the left, the more you hear.When the surrounding LEDs are turned green, they become the original speed of the sample and become the original pitch.When on an octave, it becomes pink at the bottom of the Baby-Blue and 1-octave.
Gene Sizeis the length of the audio that will be replayed on the reel.On the left, all the audio on the current splice is replayed, and if you turn to the right, you get more and more slender (Gene).Because the Gene-Size is controlled by the time unit rather than the number of samples, the playback time of one Gene does not change even if the Vari-Speed is changed.
When you fine-tune the sample with the Gene Size control, a control is provided to specify the sample
Slidefor theOn the left, the first Gene will be played on the current splice, and the other Gene will be played back to the right.The Slide control on Gene differs from the Organize control of Spreis, and the Slide changes its reproduction position immediately, whereas Organize means that Organize will change the playback splice when it reaches the end of the Sprice playback.
The modulation of the Slide is very effective in changing the new sound.The modulation of continuous voltages, such as LFO, changes the replay position continuously, and the replayed position changes in the modulation of the sequence, such as the sequencer, in the discontinuity of the replay position.
Morphdetermines the timing or overlap of the Gene's pronunciation.In the left-most position, a Gene is pronounced with a small interval of time.In a roughly 8:30 position, Gene is replayed with no overlap or spacing, and more than one Gene overlaps gradually over it, and the degree of overlap is raised as it goes to the right.If you turn right, you can create a pitch effect and stereo effect, so you can create more complex textures.
CLOCKInput can help you to control some parameters.When the Morph is left by 12 and the size of the Gene is smaller than the whole splice, it proceeds with a Gene that replays every time the clock is received.It is also effective to modulate the Vari-Speed or Gene Size when working with Gene one-by-one.The timing of the recording also is to be quarted in the timing of the clock.
CV Outoutputs the size of the audio output from Morphagene with a CV (envelope follower). It can also be used to modulat morphagene's own parameters, such as Slide. As you turn up morph, the volume changes smoothly, so the CV Out changes calmly.
Vari-Speed Activity Window and Time Stretch
The color of the LED window around the Vari-Speed knob indicates the status of the Vari-Speed and Morph controls. When the Vari-Speed knob is on the right side of 12 o'clock (reversed on the left side), the right hand side of the window shows the relationship between the playback pitch and the original pitch, and when it turns green, it becomes the original speed of the sample and becomes the original pitch. Baby-Blue, when on one octave, will be pink when under 1 octave.
In a window opposite to the window that represents the Vari-Speed state, indicates the state of the Morph control. When the clock does not have input patched, morph shows the overlap of the Gene, and the overlap of The Gene increases by one, and it becomes red to orange at morph position.
When clock is patched, the clock role changes at morph position. For a while from morph left full, the window is displayed in a red system, and the clock is used as a normal Gene shift. If you turn it any further,
Time Stretchmode, and the window is blue. Turn the Gene-Size knob to the right, enter the clock, and change vari-speed to change the pitch without changing the speed of playback. Speed is controlled by the clock.

The appearance of the overlap by the Morph knob and the color of the corresponding activity window. If the left is not patched to Clock, and the right is patched to Clock. In this case, turning morph to some extent and the clock is used for time stretching, not gene shift.
Various button operations
A list of button actions, including splice and audio deletion.
- REC button press: Record to current splice
- REC button press-push SPLICE button: create a new splice and record there
- REC button press and hold shift: Automatic adjustment of input level
- SPLICE button press: Hit the splice marker at the current playback point
- SPLICE button press and hold REC button: Enter/exit reel mode
- Press shift button: Mount the SD card, move the splice one step further
- Shift+REC button press: Remove the selected reel during reel mode. Erase the splice currently playing in normal mode (removes not only the splice marker, but also the audio in the current splice and combines the back and forth)
- Shift+REC press and hold: Erase all splices (remove splice itself, not just splice markers)
- Shift+Splice press: Remove splice markers for the splice during playback and combine splices
- Shift+Splice long press: Remove all splice markers in reels and return them to one splice as a whole
FIRMWARE UPDATE
Update the firmware in the following ways:
- Download the firmware file to the playback device and prepare for playback. Turn off morphagene.
- Do not produce non-firmware sound (notification sound, etc.) from the playback device.
- Unplug the microSD card from Morphagene
- Set the volume of the playback device to about 80% and patch the device's output to Morphagene's Left Input. If you want to monitor the playback sound, listen to left output.
- Press and hold the REC button on Morphagene to turn it on.
- When powered on, make sure that only the SPLICE activity window is green and release the REC button.
- Start playing the firmware file
- Morphagene's activity window flashes in a pattern to indicate that data is received. If you are monitoring, you will hear the pitch rising.
- When the update is over, all morphagene lights and the sound stops.
- Turn off morphagene and now press down on the SPLICE button to turn it on. Make sure that only the SPLICE window is started glowing and release the SPLICE button.
- Turn the Vari-Speed control knob from left to right, across the entire range. Then press the SPLICE button again, turn it off, and then turn it back on.
- Morphagene firmware has been updated to the latest mg137 if the Reel and Splice activity windows are green and fuchsia (pink) color, respectively, at startup
DEMO