Make Noise's first standalone desktop synthesizer. A synthesizer that is inspired by Moog and other "East Coast" philosophy and "West Coast" philosophy such as Buchla / Serge / Wiard, but does not belong to either of them. The semi-modular type allows you to start using it without patching. A patch cable is also included.
Feature
Conversion from MIDI to CV / Gate is equipped with two sets. The first MIDI A is a MIDI note that is converted to pitch CV and gate. For the second MIDI B, the output from the corresponding CV / Gate can be changed by setting
Dual mode MIDI control arpeggiator
Synchronizable to MIDI clock
Compatible with Eurorack modular CV / Gate
13 outputs, 14 input patch points
VCO is a triangle core analog
Unusual tone modulation with OVERTONE and MULTIPLY controls
Reproduce the movement of the low-pass gate with a transistor base
Voltage control for all controls
With external voice input
Headphone, line compatible output
Solid steel enclosure
Compact size of W22.9cm D14cm X H1.9cm
With patch cable, MIDI cable, AC adapter for Japan
Very compact and thin size
(Korg SQ-1 and headphones are not included)
DEMO
Details
Interface
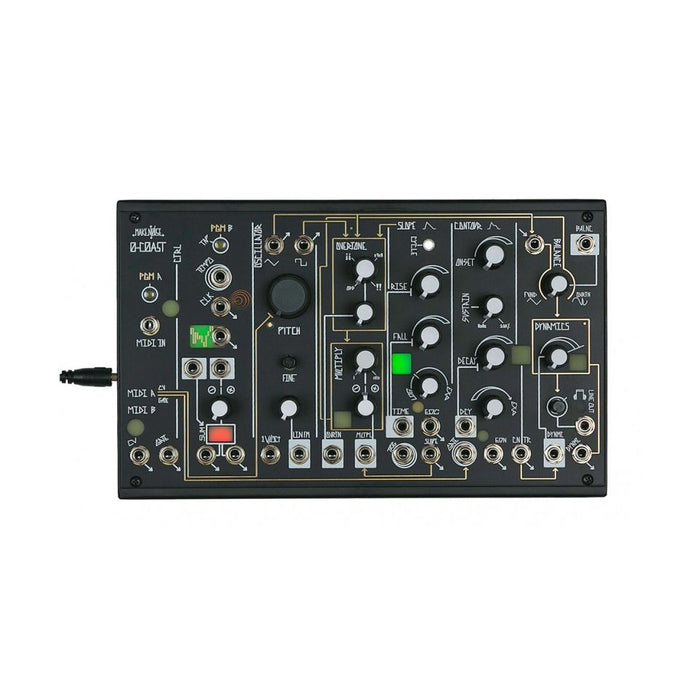
0-Coast interface is roughly from the left
MIDI section
CV utility sections such as Random and Voltage Math
Oscillator section
Overtone addition section controlled by OVERTONE / MULTIPLY
West Coast style envelope / function generator SLOPE section
East Coast Style Envelope CONTOUR Section
Final output section for mixing waveforms and controlling voltage for volume
It has become.
Explanation of each part is displayed by mouse over
Signal Flow
Gold lines show how signals are internally connected. As for the audio flow, the oscillator outputs a triangular wave and a square wave, then passes through the Overtone and Multiply sections, which add harmonics, and is transformed into a complex waveform. The complex waveform and triangular wave are mixed according to the settings in the Balance section, and the volume is controlled by the Contour envelope (rising with gate signals and MIDI notes) in the last Dynamics section, and is sounded. The flow of these controls and signals can be modulated or altered by patching.
How to play
0-Coast is fun to play, even without patch cables, while still using modular synth techniques. Basic means of playing
Playing with CV / Gate: Patch the pitch CV to the oscillator 1V / Oct jack and the gate to the CONTOUR section GATE jack
Performance using MIDI transmitted via a stereo mini cable: A cable that converts a commonly used DIN MIDI cable to a stereo mini is provided, and patch it to the MIDI IN jack.
Playing as a drone machine where the sound stays out when the knob is turned: Patch the output of the Voltage Math section to the DYNAMIC jack of the DYNAMICS section. The Voltage Math knob becomes the volume control
And so on. In addition to twisting the knobs to create the sound, change the circuit by connecting various inputs and outputs in 0-Coast with patch cables, and try to create a wider sound unique to modular Is possible.
Patching and final output
Jacks with arrows indicate the output of various audio / CV / Gate signals. Jacks with white background indicate CV input jacks. Jacks with double circles indicate gate / trigger signal input jacks. When patching inside 0-Coast,Patch the jack with the arrow and the jack on the white background or the double circled jack(Patching between inputs and outputs does nothing.)
The LINE OUT jack marked with the second headphone from the bottom on the right is the final output. Connect it with a stereo mini cable and send it to speakers, headphones, a mixer, or an audio interface. The DYNAMIC jack below it has the same sound, but it is used as a mono signal suitable for use in 0-Coast and modular in Eurorack.
Program Page Setting
The functions accessed from the PGM_A and PGM_B buttons allow you to make various settings that cannot be made on the panel. Use the PGM_A button to access the "Program page" for each setting item, and use the PGM_B button to set the value of the setting item. The basic operation is as follows.
Press and hold PGM_A buttonTo enter the program page setting mode. At this time, the MIDI A and MIDI B LED windows will light up twice
Press the PGM_A buttonAnd, select the program page in order. Press repeatedly until the program page you want to set is selected. There are a total of seven program pages. See below for specific settings on individual pages
herePress and hold PGM_A buttonThe settings of the selected page will return to the default settings. At this time, the MIDI A and MIDI B LED windows will light up twice
On the selected program page,Press PGM_BAnd change the setting value corresponding to the page sequentially. Press repeatedly until the desired value is reached
Press and hold PGM_B buttonThen you will exit the setting mode of the program page
To reset all program pages to the default settings, turn on the power while pressing the PGM_A and PGM_B buttons simultaneously.
Setting items on each program page
The items to be set on each program page and the setting options are as follows. As shown above, press PGM_A to switch setting items, and press PGM_B to switch setting values for each item. The parentheses indicate how the buttons light when the page is selected.
1.Arpeggiator setting (PGM_A lit): Select the arpeggiator mode from the following two.
PGM_B off (default): Play MIDI notes to the clock in the order in which they arrive
PGM_B lit: MIDI notes are stacked in the order in which they were played to create an arpeggio. When a MIDI note is turned off, the note will still play and will be removed from the arpeggio the next time the same MIDI note is turned on.
2.Legato setting (PGM_A flashes slowly): Select the legato setting from the following two.
PGM_B lit (default): The gate turns on when a MIDI note first arrives, and stays on until all notes turn off
PGM_B unlit: The gate is turned on anew when a new MIDI note arrives.
3.MIDI learn setting (MIDI_A lit): Set the MIDI channel for receiving MIDI A or MIDI B by sending MIDI data (MIDI Learn). Setting separate channels for MIDI A and B is useful for playing other synths, such as the Eurorack Modular, on a CV / Gate that has converted MIDI B.
Press PGM_B to select the MIDI you want to set. When MIDI_A is lit, set MIDI A. When MIDI_B is lit, set MIDI B. When both are lit, set both.
Set the channel by sending MIDI data for the channel you want to receive in MIDI A or B, or both MIDI
Press and hold the PGM_B button (the LED will blink twice) to confirm the MIDI Learn settings and exit the program page settings. Without this long press, the MIDI channel setting will not actually change.
If you press and hold the PGM_A button, MIDI_A and MIDI_B will receive MIDI on all channels (default setting).
4.MIDI B CV setting (PGM_A lights up, MIDI_B flashes slowly): Set what is assigned to the MIDI B CV output.
PGM_B unlit: MIDI note number
PGM_B lit: Velocity (default)
PGM_B Slow flashing: Modulation wheel
PGM_B flashes fast: Triangle LFO (independent of MIDI, set cycle by tapping PGM_A button)
5.MIDI B Gate setting (PGM_A lights up, MIDI_B flashes fast): Set what is assigned to the MIDI B Gate output
PGM_B unlit: Gate that turns ON when a MIDI note arrives
PGM_B lit: Gate turns ON when velocity is greater than 50%
PGM_B Slow flashing: Gate that turns ON when modulation wheel is greater than 50% (default)
PGM_B blinks fast: Square LFO (Independent of MIDI, since the cycle is set by tapping the PGM_A button, the cycle is the same when the triangle wave LFO is enabled with MIDI B CV)
6.MIDI clock setting (PGM_A blinks fast): This is a setting to reflect the MIDI clock to Tempo used for switching timing of random voltage. Tempo also reflects the tap tempo of PGM_B and the clock / trigger signal to the TEMPO input jack.
PGM_B off (default): MIDI clock is not reflected in Tempo
PGM_B lit: MIDI clock is reflected to Tempo
7.Calibration (MIDI_A and B flash alternately, PGM_A lit): Calibrate (adjust) the pitch signal conversion of MIDI_A CV converter and MIDI_B CV converter. This is adjusted at the time of shipment from the factory, so it is not necessary except for troubles or special adjustments. If special adjustments are required, refer to the manual for calibration. In case of trouble, please contact our shop before calibration.
Firmware Update
* As of December 2016, those who purchased before November 2016 do not have the latest firmware. Please follow the process below to update, as it includes minor bug fixes. Customers who purchased after December have the latest firmware installed. In 1.5.4, PGM_A, PGM_B, and MIDI A flash on startup.
The update work is a bit severe in the power on / off speed, so the update work may not be successful for some people. In that case,We will update 0-COAST free of charge at our shop, so please contact us via email or inquiry page.(Return shipping fee is paid by customer, only 0-Coast sold at our shop is applicable)
The modifications in 1.5.4 are as follows.
・ Fixed aftertouch bug
・ Improved timing of arpeggio and accuracy of start / stop
-Portamento synchronized with MIDI clock is now possible. ON / OFF (0: OFF, 1-127: ON) is controlled by MIDI CC # 65, and portamento time can be controlled in 1 / 64th note time units as MIDI CC # 5 increases from 0 to 127 (0 Is off). Edit the program page and turn on the MIDI clock to synchronize with the MIDI clock
-Program page editing can now be done with MIDI CC messages in addition to the PGM_A / B buttons. A dedicated Max4Live device has also been provided for easy programming from Ableton with the same features (included in the firmware Zip file).
The firmware update method is as follows. Update by pouring audio files into 0-COAST.
Download and unzip the Zip file:thisDownload the latest version 1.5.4 and unzip the ZIP file. Prepare to play the wav file included in the ZIP file from your PC or laptop at 100% volume.
Power on 0-COAST
Connect Voltage Math to TEMPO input:Turn the Voltage Math's Attenuverter at the top left of the square SUM window all the way to the right. Patches the output of Voltage Math (either two are allowed) to the TEMPO input
Hold down PGM_B
Power OFF → ON: While holding down PGM_B, turn on the powerPretty quicklyOFF / ON. Plugging and unplugging the jack is not always successful, so connect to a power strip with a switch and turn the tap switch off / on. Release PGM_B when PGM_B, MIDI_A and MIDI_B light up. Remove patch between Voltage MATH and TEMPO input
Press PGM_A: The PGM_A button lights. This is the last step where the firmware remains in 0-COAST. Failure to follow this process may result in the loss of internal firmware, loss of related functionality, and the inability to function as a synthesizer. In that case, please note that you will not be able to return to the normal state until the firmware update is redone and succeeded.
Connecting playback devices: Connect the audio output of the firmware wav file playback device to the 0-COAST TEMPO input with a normal patch cable, etc.
Press PGM_B: The firmware in memory will be erased and ready for writing
Play and update firmware: Start playback of the firmware wav file at 100% volume from a PC or mobile phone. Make sure no other audio is played, including notification sounds. If other sounds are played at the same time or the volume is inappropriate, the firmware upload will fail and all the 0-COAST LEDs will not light. In that case, repeat the firmware update process. 0-COAST will not work properly until the update is successful. During the update, PGM_A and PGM_B flash alternately. When the update is completed successfully, the blinking of PGM_A and PGM_B will go out and return to the normal 0-COAST state
Factory reset: Perform a factory reset of the settings to make aftertouch work properly. Factory reset, power off 0-COAST once, turn on power while pressing both PGM_A and PGM_B, and keep PGM_A / B pressed until MIDI_A / B stops blinking
Confirm successful update: If firmware 1.5.4 is installed, PGM_A, PGM_B, and MIDI A will blink at startup.