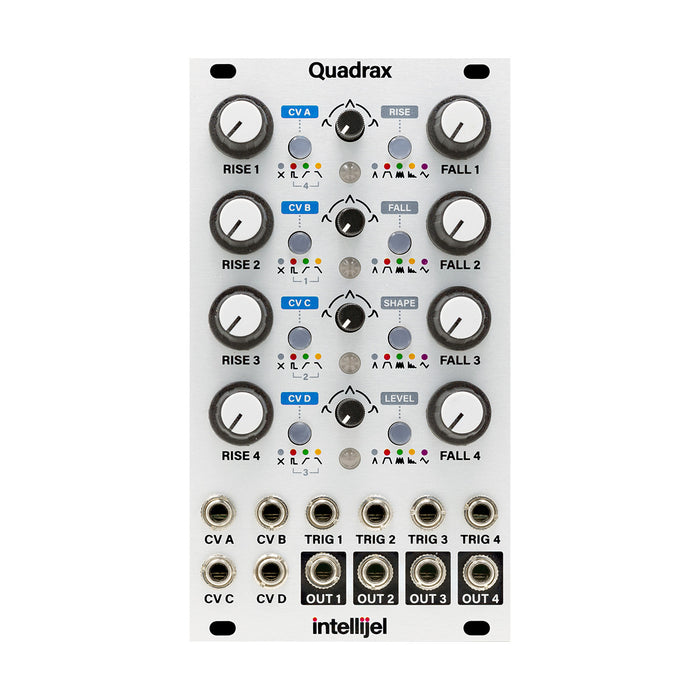
Quadrax is a 4-channel independent CV generator. At just 14HP there are four independent CV generators with a variety of controls that can be used individually or combined using patching or internal wiring to create more complex CVs.
Each channel performs one of the following functions:
AD (Attack / Decay) envelope. Level can be switched between 5V and 10V
AHR (Attack / Hold / Release) envelope. Level can be switched between 5V and 10V
Cycle envelope(LFO moving in positive range). Level can be switched between 5V and 10V
Burst generator. You can also control the burst time, burst number, burst shape, and the amount of change in pulse size during the burst. Level can be switched between 5V and 10V
LFO:Morphing and synchronization possible
randomVacillating voltage source (ver1.1 or later)
Major features:
Each channel has a response curve adjustment, so you can adjust the curve curve continuously. Also, each stage0.3 ms to 20 secondsWith a wide time range.
Between channelsLinkIs possible, and can be triggered by the trigger input of the previous channel, EOR, or EOF. It is also useful for triggering multiple envelopes with a single trigger, or for creating a quad LFO.
4 CV inputsMeans that the modulation destination isYou can assign more than one.The amount of attenuation can be set step by step inside the main unit.
Settings are remembered even when the power is turned off
DEMOS
HOW TO USE
Operation in each mode
The operation mode of each channel of Quadrax can be switched by repeatedly pressing the button on the right side of the channel. The function of each part differs depending on the mode. Each mode with firmware 1.1Alternate modeWas added. To switch, press MODE / DESTINATION button for more than 1 second.
AD (Attack / Decay) envelope mode
When the mode button is not lit, the channel functions as a classic attack / decay envelope. Each knob controls the following parameters:
Rise: Attack time
Fall: Decay time
Response: curve shape
When receiving a trigger input, the envelope always performs one cycle to the end.Alternate mode changes the curve shape (Rise / Fall swells up or both swells down)
AHR (Attack / Hold / Release) envelope mode
When the Mode button is lit red, you are in Attack / Hold / Release Envelope mode. Each knob controls the following parameters:
Rise: Attack time
Fall: Decay time
Response: curve shape
When the gate signal is high, the signal is held (100% sustained), and when it is low, it moves to the release stage. If you are still in the RISE stage when the gate goes low, start the release from that level without sustaining. Use the small response knob in the middle to set how the envelope bends.Alternate mode changes the curve shape (Rise / Fall swells up or both swells down)
Cycle mode
When the Mode button is lit green, it is in cycle mode and the channel behaves like a looping AD envelope, an LFO that moves only in the plus range. Each knob controls the following parameters:
Rise: Attack time
Fall: Decay time
Response: curve shape
The control of the waveform is the same as the AD envelope. The trigger input can be used to reset the waveform.Alternate mode changes the curve shape (Rise / Fall swells up or both swells down)
Burst mode
When the Mode button is lit in yellow, you are in burst mode and you can cycle the envelope for a specified number of times. Each knob controls the following parameters:
Rise: Burst rate (ver1.0: Length of burst)
Fall: burst length (ver1.0: number of bursts)
Response: The nuance of the burst.Alternate mode has a different burst envelope shape
LFO mode
When the Mode button is lit pink (magenta), it is in LFO mode and outputs an LFO that moves ±. The LFO can be synchronized with the clock input to the trigger. Each knob controls the following parameters:
Rise: LFO speed (x64 to 1/64 when clocking TRIG)
Fall: LFO waveform deformation
Response: LFO waveform deformation
The waveform can be changed continuously and changes as follows
LFO Alternate mode
The Alternate mode of the LFO isPowerful to change the destination randomly every clockRandom CVGenerator (vacillating voltage source).
Each knob controls the following parameters:
Rise: Rate to change destination
Fall: random runout
Response: The amount of slew limiter applied to output random
Link between channels
Quadrax can use the previous channel to trigger the next channel (link function). Use the small button on the left of each channel to switch the link method.
No Link: Trigger envelopes and LFOs on own channel's Trig input, no link between channels
Trigger Link: Internally wired so that the trigger to the trigger input of the previous channel (CH4 for CH1) triggers the envelope and LFO. Triggering on your own channel is also valid.
End of Rise Link: The internal connection is made so that the envelope or LFO is triggered at the end of the last channel (CH4 for CH1), the moment the attack ends. Triggering on your own channel is also valid.
End of Fall Link: The internal connection is made so that the envelope or LFO is triggered at the end of the last channel (CH4 for CH1), the end of the decay. Triggering on your own channel is also valid.
CV assignment
CV assignments in Quadrax are very flexible and powerful. Each of the A to D CV inputs can be assigned to modulate one or more of the envelope parameters for CH1 to CH4 with different amounts of attenuation. Assignment setting and display are done with buttons and normal knob control can be used as is, so operability is not impaired.
To enter Assign mode, press and hold the Link button on the left side of the channel to which you want to assign CV control for at least one second. The button for the selected channel flashes magenta. To exit Assign mode, press and hold this button again for more than one second. If you want to set another channel, press and hold the button for that channel. Press one of the four Link buttons on the left to select the CV input for which you want to make assignment settings (blue). The buttons on the right indicate which parameters to modulate, and correspond to the Rise, Fall, Shape (response) and Level (magnitude) assignments from the top.
CV assignment mode. Here, Rise and Fall of CH1 are set to be modulated by CVC. However, Rise is modulated in the positive direction (green) and Fall is modulated in the negative direction (red). The brightness of the button indicates the intensity of the modulation, and you can adjust this intensity in four steps by repeatedly pressing the button. Press and hold the mode button to reverse the CV effect (Attenuverter).
In Assign mode, CV assignment can be cleared all at once. To clear all CV assignments for a channel's parameters, press and hold the Link and Mode buttons for that channel simultaneously. To clear all assignments for all channels, press and hold the CH1 Link button and CH4 Mode button simultaneously.
System Mode
System mode is a special boot mode for changing global settings, and you can turn it on by holding down the MODE/DESTINATION button on CH4. In System mode, the following settings are possible
Press the CV A button to set the level of the envelope. The color is 10V (default) in blue and 5V in green
Press the RISE button to toggle the on/off of the burst mode retrigger. Off in blue (default), green is ON.
Press the flashing red LEVEL button to exit System mode
Firmware Update
The steps for updating the firmware are as follows:
Turn off the module
Connect the USB cable to the computer from the back of the module.
IntellijelPageOpen the updater downloaded from and select the module and version from the drop down.
Press the CV A button on the top left and the RISE button on the top right to power the module back on.
At the bottom of the updaterUpdateThe progress bar begins when you press the button, and when the message "Update completed successfully" appears at the end, the update is terminated.
Reboot the modular will work with the new firmware